In this article, I will introduce how to bake procedural textures in Blender and export (save) them as image files. I will also explain the causes and solutions when you cannot bake.
1. Why is Baking Procedural Textures Necessary in Blender?
Procedural textures created by connecting nodes such as the Noise Texture node and Voronoi Texture node in Blender’s Shader Editor cannot be reproduced as-is in other software like Unity or VRChat.
Therefore, the process of “baking” is necessary so that you can export the procedural texture as an image file.
Since complex procedural textures can be computationally heavy, even if you only use them within Blender, there are cases where they are baked and exported as image files to lighten the viewport display and shorten rendering times.
2. Basic Steps to Bake Textures in Blender
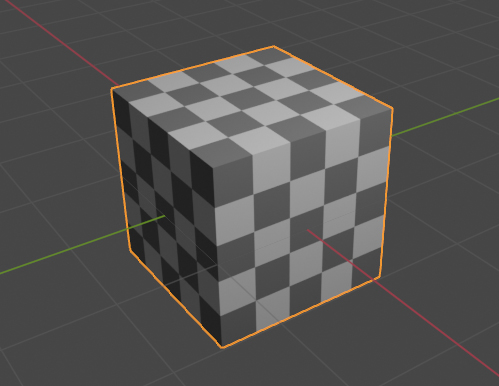
First, as a basic baking procedure, assign a procedural texture created with the Checker Texture node to the default cube as a base color map (see the image below),
and I will introduce the steps up to baking and exporting it as an image file (see the image below).
Step 1: Create a Procedural Texture
Select the cube and open the Shader Editor.
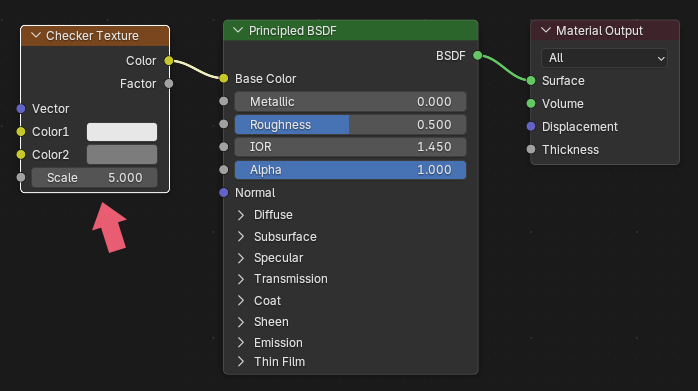
From the Header, go to Add > Texture to add a Checker Texture node, and connect them (see the image below). The arrow in the image indicates the Checker Texture node.
This completes the procedural texture.
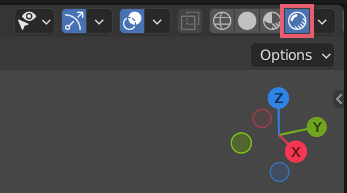
If you switch the Viewport Shading at the right end of the 3D Viewport‘s Header to Material Preview (see the image below),
check if the texture is displayed on the cube (see the image below).
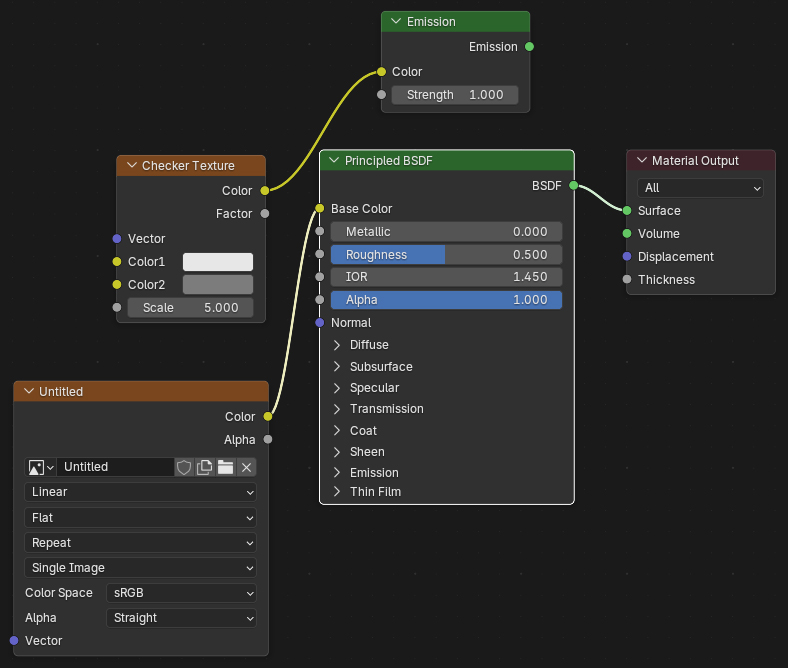
Step 2: Add an “Emission” Node
Select the cube, add an Emission node from Add > Shader in the Shader Editor‘s Header, and connect it to the Checker Texture node and Material Output node (see the image below). The arrow in the image points to the Emission node.

The reason for using the Emission node instead of the Principled BSDF node is that you can bake without being affected by lighting or shadows.
Step 3: Add an “Image Texture” Node
Add an Image Texture node from Add > Texture in the Shader Editor‘s Header.
Since this Image Texture node will be used as the bake destination, leave it disconnected from any other nodes (see the image below). You can place it anywhere. The arrow in the image indicates the target Image Texture node for baking.

Click New inside the target Image Texture node, and the New Image menu will appear. Set the name and resolution to your desired values, then click OK (see the image below).

Here, I left the name as “Untitled” and the resolution as 1024×1024.
If you do not need transparency information, uncheck Alpha.
Check that the name “Untitled” created above is displayed on the target Image Texture node (see the image below).
Also, make sure that the Color Space is set to sRGB.
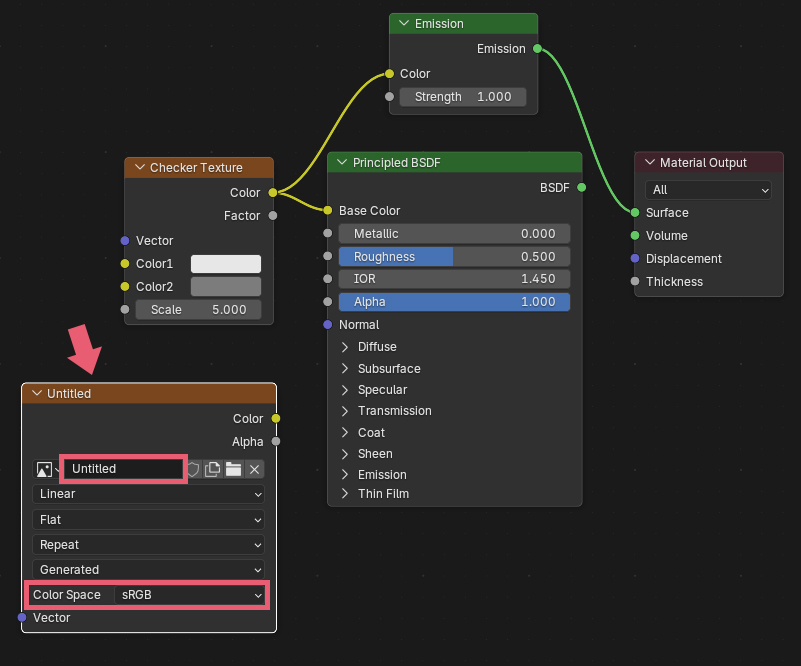
Continue the following operations while keeping the target Image Texture node selected.
The selected node will have a white outline, like the Image Texture node shown in the previous image.
Step 4: Change the Render Engine to “Cycles”
In Properties > Render Properties, change the Render Engine to Cycles (see the image below).
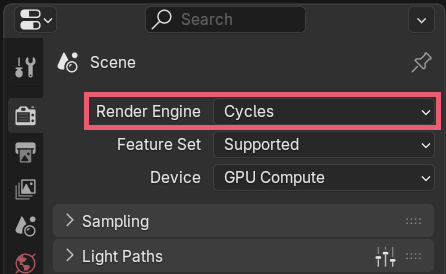
If you want to render with Eevee, switch back to it after the baking is finished.
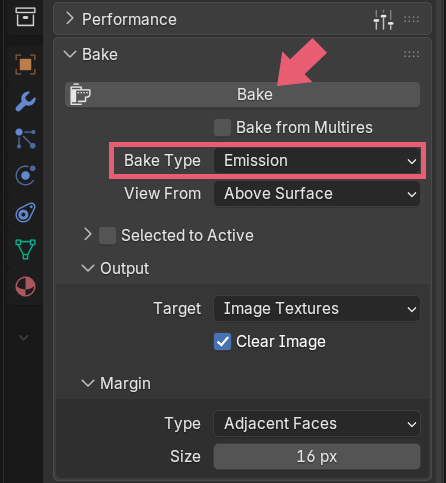
Step 5: Bake Settings and Execution
In Properties > Render > Bake, set the Bake Type to Emit (see the image below).
After confirming that the cube is selected and the target Image Texture node is selected in the Shader Editor, click the Bake button. This will start the baking process.
* Note: When you execute the bake, the color space in the selected image texture node in the shader editor will be grayed out, but it will return to normal once you save it as an image file.
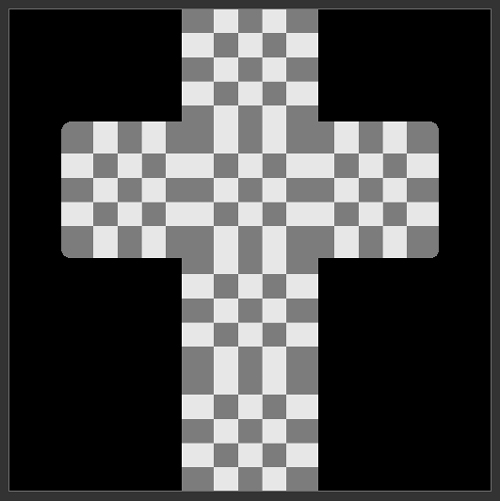
If you open the Image Editor or UV Editor, you can see the baked result (see the image below).
If the baked result is not displayed, select “Untitled” from the section in the Header (see the image below).

Step 6: Export (Save) the Baked Result as an Image File
The baked result is not automatically saved as an image file, so please save it as follows.
Click Image > Save As in the Header of the Image Editor or UV Editor (see the image below), and the Blender File View will appear.

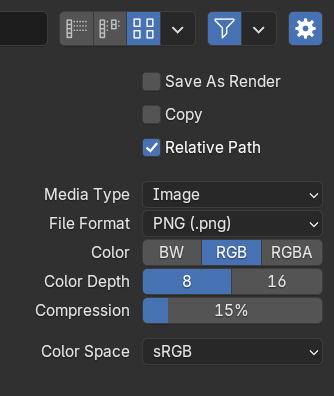
Set the save location, image format, etc., and click Save As in the bottom right corner to save.
You can adjust these settings on the right side of the Blender File View (see the image below).
Usually, the default settings are fine, but if you have transparency information, select RGBA.
Blender has an Export feature for outputting 3D data, but there is no dedicated export feature for images, so we use Save As to export them as image files.
About “Save 1 modified image(s)”
If you try to close Blender without saving the image, the exit confirmation dialog will display “Save 1 modified image(s)”. The behavior when checking or unchecking this is as follows:
If you close Blender with the checkbox enabled:
- If the image is already saved, it will be automatically overwritten.
- If it is an unsaved new image, it will be packed inside the “.blend” file (it will not be saved as an external image file).
If you close Blender with the checkbox disabled:
- If the image is already saved, it will not be overwritten (the changes will be discarded).
- If it is an unsaved new image, it will be completely discarded.
Step 7: Check the Finished Image File
Connect the nodes in the Shader Editor (see the image below) to check the exported image file.
In the 3D Viewport, confirm that the result is the same whether the Checker Texture node was connected or the Image Texture node with the exported image is connected (see the image below).
This completes the procedure for baking a procedural texture and exporting it as an image file.
3. Steps to Bake Maps Like Roughness and Normal Created with Procedural Textures
So far, I have introduced the baking procedure for the base color map, but other maps can be baked using the same procedure.
However, please note the following points.
3.1 Baking Roughness, Metallic, Bump, and Other Maps
Grayscale maps created with procedural textures, such as roughness, metallic, alpha masks, and bumps, can also be baked using the emission node in the same way as the base color map.
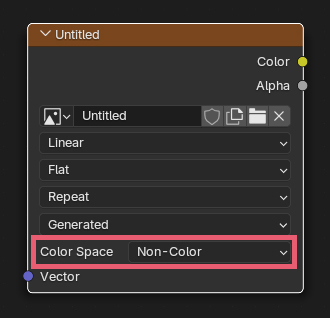
However, set the Color Space of the target Image Texture node to Non-Color (see the image below). If it remains as sRGB, it will not bake correctly.
When baking a grayscale texture created with a procedural texture to use as a bump map, connect it directly to the Emission node. There is no need to insert a Bump node.
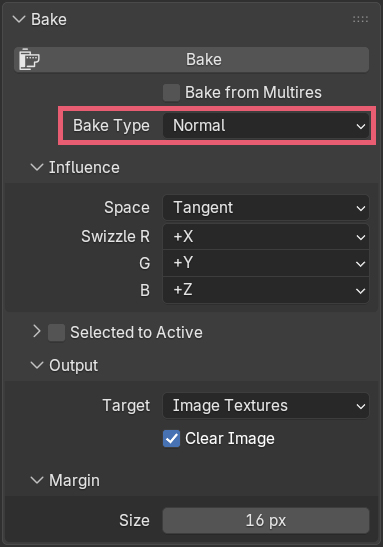
3.2 Baking Normal Maps
When baking a grayscale texture created with a procedural texture to use as a bump map into a normal map, you can also bake it using the same steps as the base color map introduced earlier.
However, the following points are different.
Do not use the emission node; use the Principled BSDF node as is.
At this time, leave the Bump node connected as well.
Set the Color Space of the target texture to Non-Color (see the image below).
In Properties > Render > Bake, set the Bake Type to Normal and bake (see the image below).
4. Appropriate “Margin” Settings When Baking in Blender
The Margin that can be set in Properties > Render > Bake has a default Size of 16px. Decrease this value if it overlaps with other UV Islands during baking.
An island is a structurally connected chunk in a UV map.
For example, if you check the UV map of the Monkey (Suzanne) in the UV editor, you can see that it consists of three islands: the head, the right eye, and the left eye.
Be careful, as setting the Margin value too small can cause the background color to bleed through as black lines.
Looking at the baked results with different Margin Sizes, it looks like this:
This is a bake with the Margin Size set to 16px (see the image below).
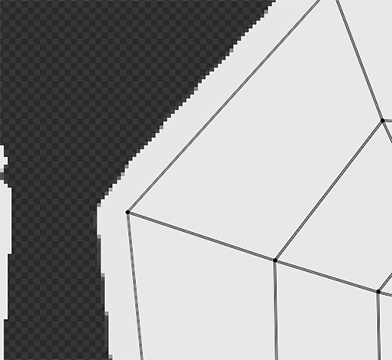
This is a bake with the Margin Size set to 3px (see the image below).
5. Anti-Aliasing (Jagged Edges) Countermeasures for Baked Image Files
Since there is no anti-aliasing setting for baking in Blender, diagonal lines in baked image files can sometimes appear jagged like stairs. In that case, take the following steps.
- In the New Image menu set in Step 3, set the resolution higher than the target size. For example, if you want to create a 1024×1024 image file, set it to 2048×2048 and bake.
- After exporting the baked result as an image file, open it in an image editing software like Photoshop.
- Scale down the image size to your target 1024×1024 and export it.
6. Baking to a New UV Map
If you want to bake to a new UV map without wasting your existing textures, add a new UV map to the object and bake with that UV map selected.
You can add a UV map in Properties > Data > UV Maps.
I explain this in detail in the following article.
7. Combining Multiple Image Files into One
If you have added two or more materials to a single object, you can combine the image files into one by baking. This allows you to consolidate your materials into one as well.
Combine the two UV maps into a new UV map, perform the actions in Step 3 for all materials, and then bake.
8. Troubleshooting Common Baking Errors in Blender (Q&A)
8.1 Getting the “No active and selected image texture node found…” Error
This is caused by not selecting the target Image Texture node.
As explained in Step 3, select the target Image Texture node in the Shader Editor and execute the bake again.
8.2 Getting the “No valid selected objects” Error
This happens because the object to be baked is not selected.
Before executing the bake, make sure your object is selected.
8.3 Getting the “Object is not enabled for rendering” Error
This is because the object’s rendering setting is turned off.
Check the Outliner to ensure the camera icon for the selected object is enabled.
If the camera icon has an X on it (see the image below), the render setting is disabled.

8.4 The “Bake” Button is Missing
If there is no Bake menu in Properties > Render, check if the Render Engine is set to Cycles.
That concludes the guide on “How to Bake Procedural Textures and Save Images” in Blender.


Comments