This guide explains everything from how to import images to use as references (also known as reference images or background images) in Blender, to positioning and configuring their display settings.
1. What Can You Do with Reference Images in Blender?
In Blender, you can load images such as character model sheets (front, side, and back views) or product blueprints (front, top, and side views) as reference images and model while viewing them as an reference images.
It is difficult to model without looking at anything, but using a reference image makes it much easier to accurately recreate shapes and proportions.
2. How to Import Reference Images in Blender
2.1 How to Import from the “Add” Menu
Before importing a reference image, press Numpad 1 to set the view to Front.
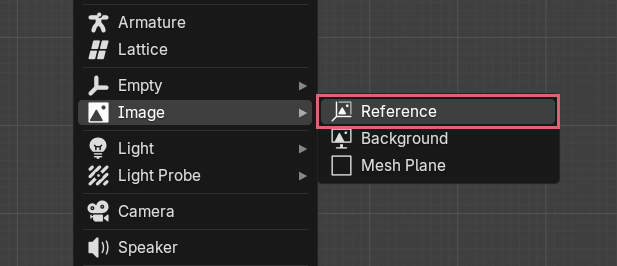
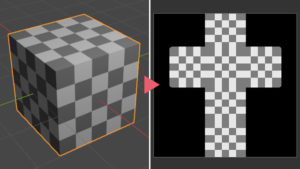
With the 3D Viewport in Object Mode, press Shift + A to open the Add menu, and select Image > Reference (see the image below).
When the Blender File View appears, double-click the reference image you want to import.
This will load the image into the 3D Viewport.
The reference image will automatically be assigned a name like “Empty” or “Empty.001”.
Since the reference image is loaded to face the current view (orientation) of the 3D Viewport, if you didn’t set the view to Front beforehand, you will need to rotate and adjust it after importing. The same applies when adding via drag and drop, which is introduced next.
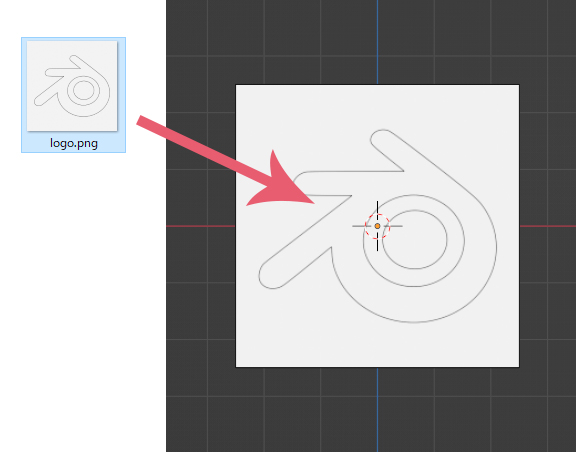
2.2 Adding via Drag and Drop
In this case as well, before importing, press Numpad 1 to set the view to Front.
You can also load a reference image by directly dragging and dropping it from a folder onto the 3D Viewport while in Object Mode (see the image below).
3. Basic Operations and Recommended Settings for Reference Images in Blender
3.1 Basic Operations as an Object
Because an imported reference image is treated as the same type of object as an Empty (only the Display As setting of the Empty is different), the following basic operations are the same as for other objects.
- Click to select
- G to change location / Alt + G to reset location
- R to rotate / Alt + R to reset rotation
- S to scale / Alt + S to reset scale
- H to hide / Alt + H to unhide
- X to delete
When you select a reference image, an orange outline appears. However, depending on the colors, it might be hard to see, so please also check the Outliner to confirm if it is selected. The Outliner is the area in the top right of the screen where objects are listed.
Reference images will not be rendered.
3.2 Transparency Settings
3.2.1 “Opacity”
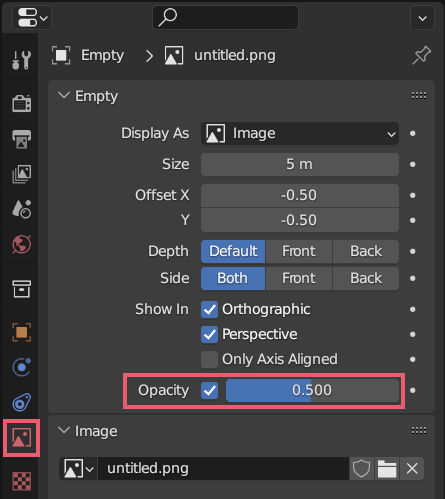
With the reference image selected, you can adjust the transparency using the Opacity checkbox and slider located in Properties > Data > Empty (see the image below).
If you set the value to 0.00, it becomes completely transparent and invisible.
3.2.2 “Depth”
Depth is a setting that determines how the reference image is displayed (how it is hidden) when it overlaps with other objects.
The image below shows a cube object and a reference image placed overlapping each other, with only the Depth changed from left to right: Default, Front, and Back.
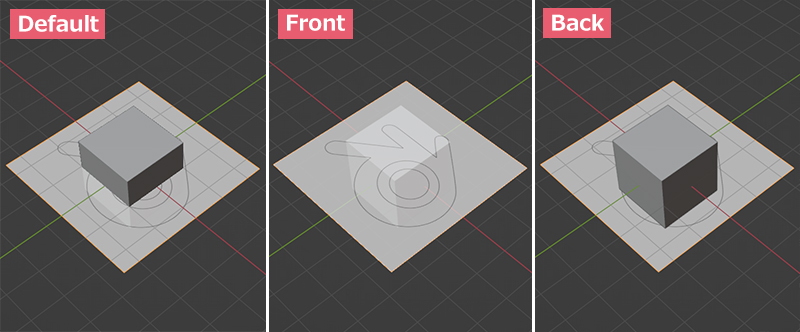
- With Default, the display changes based on the reference image’s location. If it overlaps or is behind the object, that part is hidden, but if it is placed in front of the object, it won’t be hidden.
- With Front, it is always displayed in front regardless of the reference image’s location.
- With Back, it is always displayed in the back regardless of the reference image’s location.
3.2.3 “Side”
Side controls the display settings for the front and back of the reference image.
Both displays both the front and back, Front displays only the front, and Back displays only the back.
3.3 Flipping the Reference Image Horizontally
With the reference image selected, press S, then X, type -1, and press Enter to flip it horizontally.
Press S, then Z, type -1, and press Enter to flip it vertically.
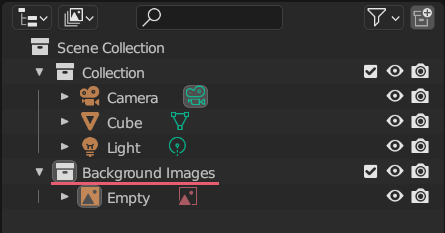
3.4 Managing Reference Images
If you create a new Collection in the Outliner to manage your reference images, operations like hiding/unhiding become easier.
In the example in the image below, a Collection named “Background Images” was created to manage the reference images there.
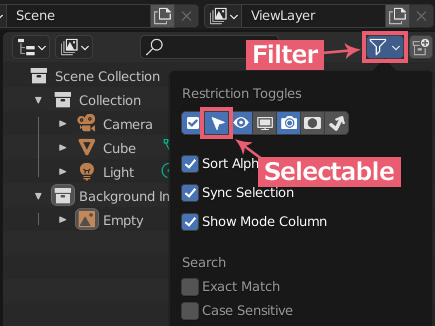
3.5 How to Make Reference Images Unselectable
To prevent reference images from being selected when clicked in the 3D Viewport, use the following settings.
Click on Filter in the top right of the Outliner to reveal the Restriction Toggles menu, and then click Selectable to turn it on (it is on when it is blue) (see the image below).
After that, click the Disable Selection icon for the entire Collection used to manage reference images, or just for specific reference images (see the image below).
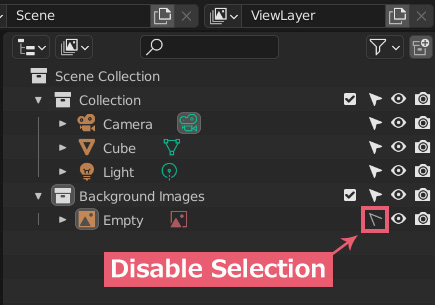
Now, clicking the reference image in the 3D Viewport will no longer select it.
If you click the Disable Selection icon again, it will become selectable once more.
4. Other Operations for Reference Images in Blender
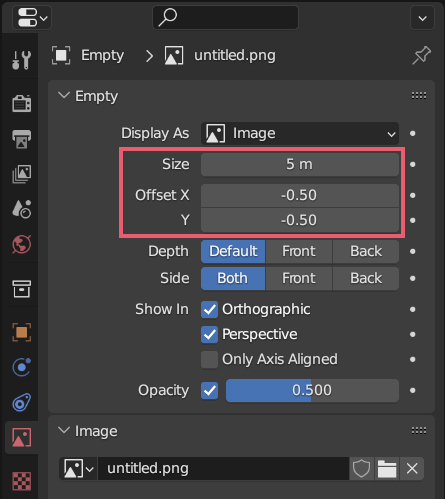
4.1 Adjusting Location and Size – Using “Size” and “Offset” in “Properties”
With the reference image selected, you can find Size and Offset under Properties > Data > Empty (see the image below). These settings allow you to adjust only the display location and scale of the reference image without changing the location or scale of the object itself.
4.2 Adjusting Location and Size – Using the Reference Image Icons
The Size and Offset mentioned above can also be adjusted using the icons directly on the reference image.
With the reference image selected, moving your mouse cursor near the center of the image will display an “X” mark; you can drag this to adjust the location (see the image below).
Also, if you move the mouse cursor to the edge of the image, the edge will highlight in yellow; you can drag this to scale it up or down.
4.3 How to Match the Sizes of Multiple Reference Images
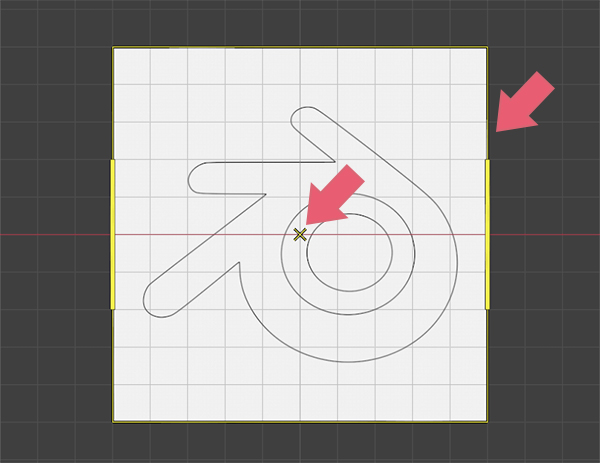
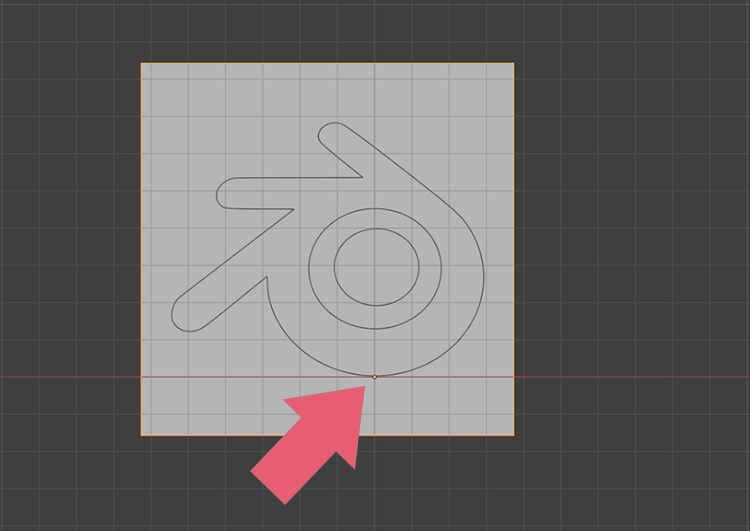
When using three reference images for front, side, and back views, it becomes easier to match their sizes if you align the lowest part of the reference images with the position of the reference image’s Origin, as described below.
For example, when using a reference image like the one in the image below (the arrow points to the Origin location),
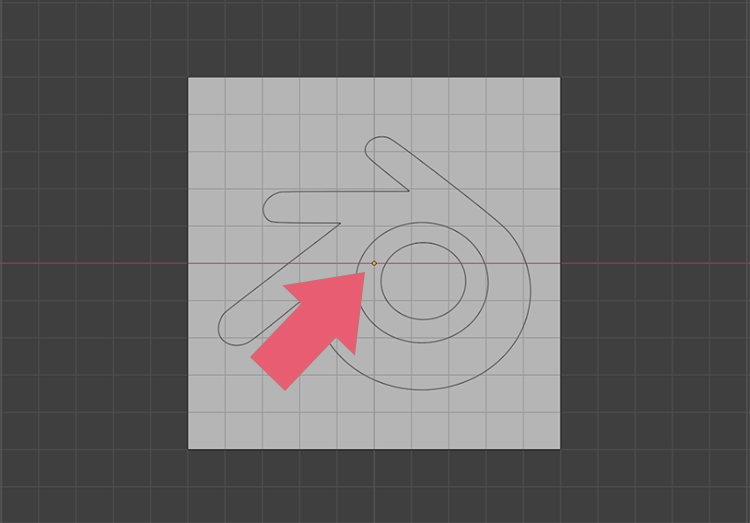
Use Offset to adjust the location so that the bottom-most part of the reference image aligns with the Origin location, as shown in the image below.
If you press S to scale it in this state, the bottom-most part of the reference image will remain fixed, so you only need to match the location of the top-most part.
4.4 Difference Between “Reference” and “Background”
In the Add > Image menu, there is Background below Reference. The only difference between the two is their default settings for Depth, Side, and Show In in the Properties, as shown in the image below.
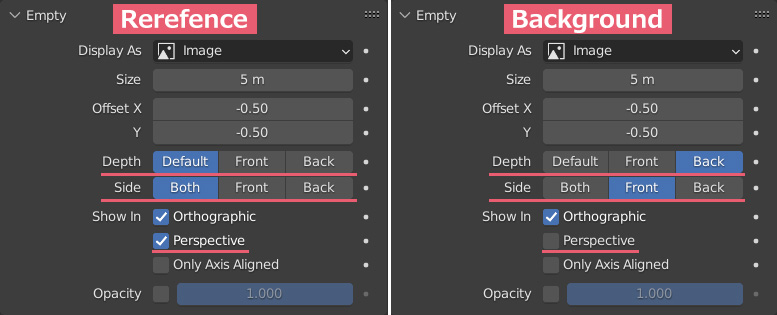
When you add an image via drag and drop, it is loaded with the Reference settings.
4.5 “Show In”
4.5.1 “Orthographic“
If you check Orthographic under Show In, the reference image will only be displayed when you are using orthographic projection.
Reference images loaded via Add > Image > Reference or drag and drop have Orthographic checked by default (see the image below).
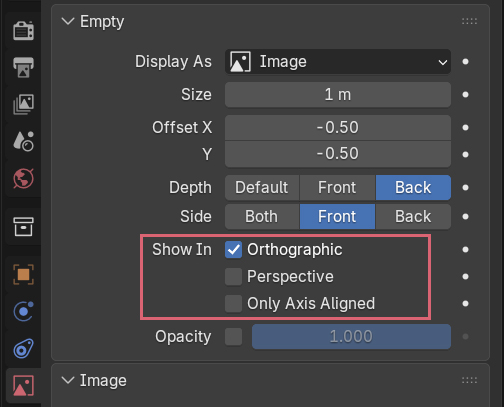
If a reference image was displayed when the view was set to Front but disappears when you rotate the view, this happens because Blender has Auto Perspective turned on by default. Rotating the view automatically switches it to perspective projection.
If you want the reference image to remain visible even while rotating the view, you must also check Perspective (introduced next) in addition to orthographic projection.
Alternatively, you can turn off Auto Perspective so that the view remains in orthographic projection even when rotating.
4.5.2 “Perspective“
If you check Perspective under Show In, the reference image will only be displayed when you are using perspective projection.
4.5.3 “Only Axis Aligned“
If you check Only Axis Aligned under Show In, the reference image will only be displayed when it becomes parallel (facing completely front-on) relative to the view (orientation) of the 3D Viewport.
Please use Only Axis Aligned in combination with Orthographic and Perspective under Show In.
For example, if you are working with Auto Perspective turned off and have Orthographic checked, the reference image will be displayed even when you are rotating the view.
At this time, if you check Only Axis Aligned, you can configure it so that it is hidden while rotating and only displays when the view is set to, for example, Front.
5. Common Issues and Solutions When Using Reference Images in Blender
5.1 Where Reference Images Can Be Imported
You can only load reference images via drag and drop directly into Blender’s 3D Viewport.
Dragging and dropping them into areas like the Outliner will not import them.
5.2 The Mode for Importing Reference Images
Please ensure you are in Object Mode when importing reference images.
5.3 Unsupported Image Formats for Reference Images
Depending on the version of Blender, there are some image formats that cannot be loaded as reference images.
Generally, formats like JPEG and PNG are reliable choices.
5.4 Reference Image Disappears or Is Not Displayed
If the reference image disappears or becomes invisible, please check the following:
- If Opacity is set to 0.00, increase the value.
- Depending on the Depth selected, the reference image might be hidden if it overlaps with an object.
- If Side is set to Front, it will only be visible from the front; if set to Back, only from the back.
- If you are in a projection mode that is not checked under Show In, the reference image will be hidden.
- If you have hidden it using the H key, the eye icon in the Outliner will be turned off.
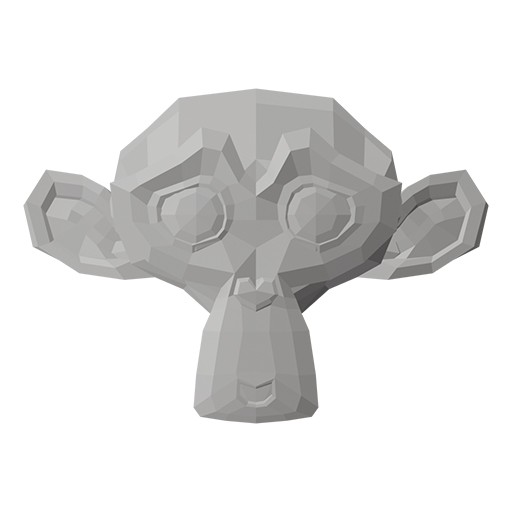
6. Why Things Might Look Off Even When Matched to the Reference Image
This often happens when creating characters: you might build a model that perfectly matches the reference image, yet still feel that “something just looks off.”
In addition to the inherent difficulty of translating 2D into 3D, this issue is often related to differences in projection methods, such as:
- Whether the reference image was drawn in orthographic or perspective projection.
- Whether you are using orthographic or perspective projection in Blender while matching the model to the reference image.
- Whether you will be rendering (capturing) the finished 3D model using orthographic or perspective projection.
If you model a character by matching it in orthographic projection to a reference image that was drawn in perspective projection, the finished 3D model will likely look unnatural when viewed or rendered in perspective projection.
For example, if you render Blender’s Monkey (Suzanne) to use as a reference image, it will look like the image below in orthographic projection,
and it will look like the image below in perspective projection.
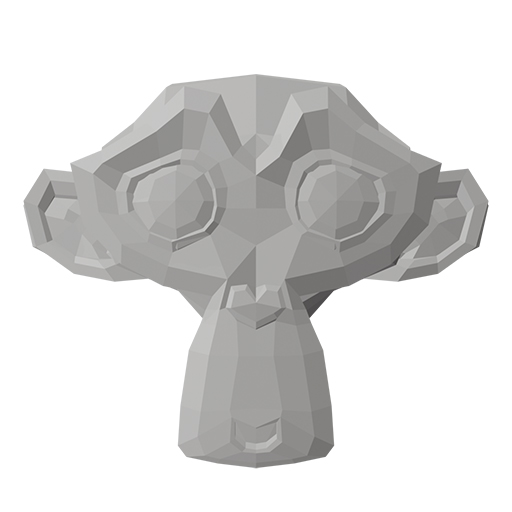
If you were to use these reference images and model them individually in orthographic projection, even if you matched both perfectly to their respective reference images, there would be a significant difference in the finished 3D models.
That covers the guide on “Importing, Positioning, and Display Settings for Reference Images” in Blender.


Comments